Intro
I have an application running on my Raspberry Pi. As you might know SD cards are so fragile. They can be corrupted easily because of voltage changes or sudden power of situations. I need to create a spare backup SD card with the same system and application already installed. Since, It is a Linux based system and I don’t want to deal with installing libraries, additional packages, and remote access software. So the solution is simple. If you are on a Windows you can use Win32 Disk Imager. If you are on Mac you can easily create the exact system by using Unix commands on Terminal app that comes with Apple OS.
Requirements
- Check your source SD Card brand and disk size on Raspberry Pi. The source and destination SD Card sizes must be same. Otherwise it doesn’t work. There are some workarounds for that issue but I didn’t want to deal with that.
- You might need an SD card adapter to create the image of your original clone of the RPi system.
Steps
- Shutdown the Raspberry Pi and remove the SD Card.
- Attach the SD Card to your Mac.
- Open Terminal and type →
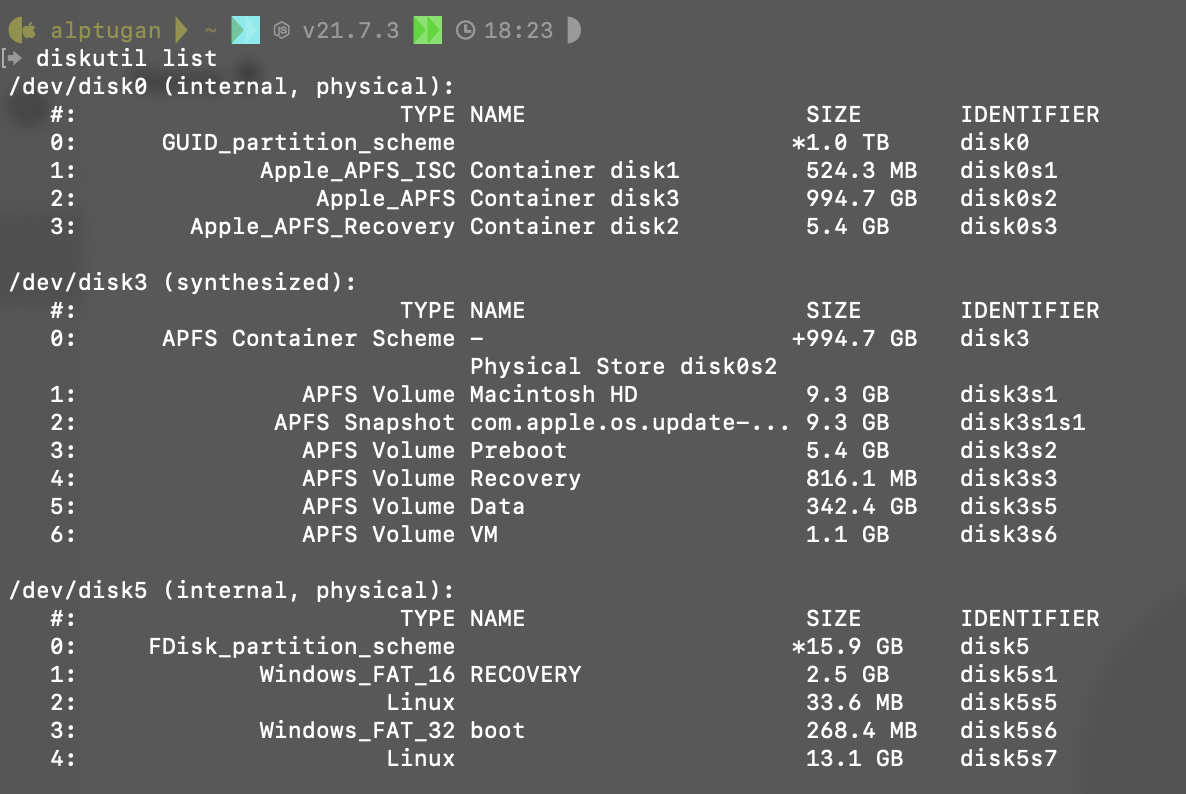
diskutil listYou should see something similar the image below.
/dev/disk5is the name of my source SD Card including the full OS system on my RPi. Yours might be different. But in any case, it must be/dev/diskXXsome number after thediskword. Now we need to unmount the disk in order to read its content and create.imgfile from it. Type →diskutil unmountDisk /dev/disk5
- Create the SD card clone in your computer’s hard drive using the following command. The destination file path must be absolute path. The
.imgfile will be created on my desktop →sudo dd if=/dev/disk5 of=/Users/alptugan/Desktop/rasp4boyner.imgAfter the command, you will be asked for your Mac password.
- Wait until the process is finished. Depending on your SD Card it might take half an hour. There will be no process preview or remaining time. So be patient and wait for the process is finished. When the process done, you will see something like the following image;

- Now you can safely remove the SD Card and plug the empty one. Repeat the step 3 and 4 again.
- Now we need to write the
imgfile to the new fresh SD Card. Actually, we run the same code in Step 5 by switching the input and output file names as follows →sudo dd if=/Users/alptugan/Desktop/rasp4boyner.img of=/dev/disk5 - Be patient and wait. When the cloning process is done, you will see the blinking cursor on your Terminal.
Software Alternative on Mac
- Apple Pi Baker → outdated
- Built-in Raspberry Pi application. → The cloning process is dead slow on Raspberry Pi.