Analysis and Planning of The Game
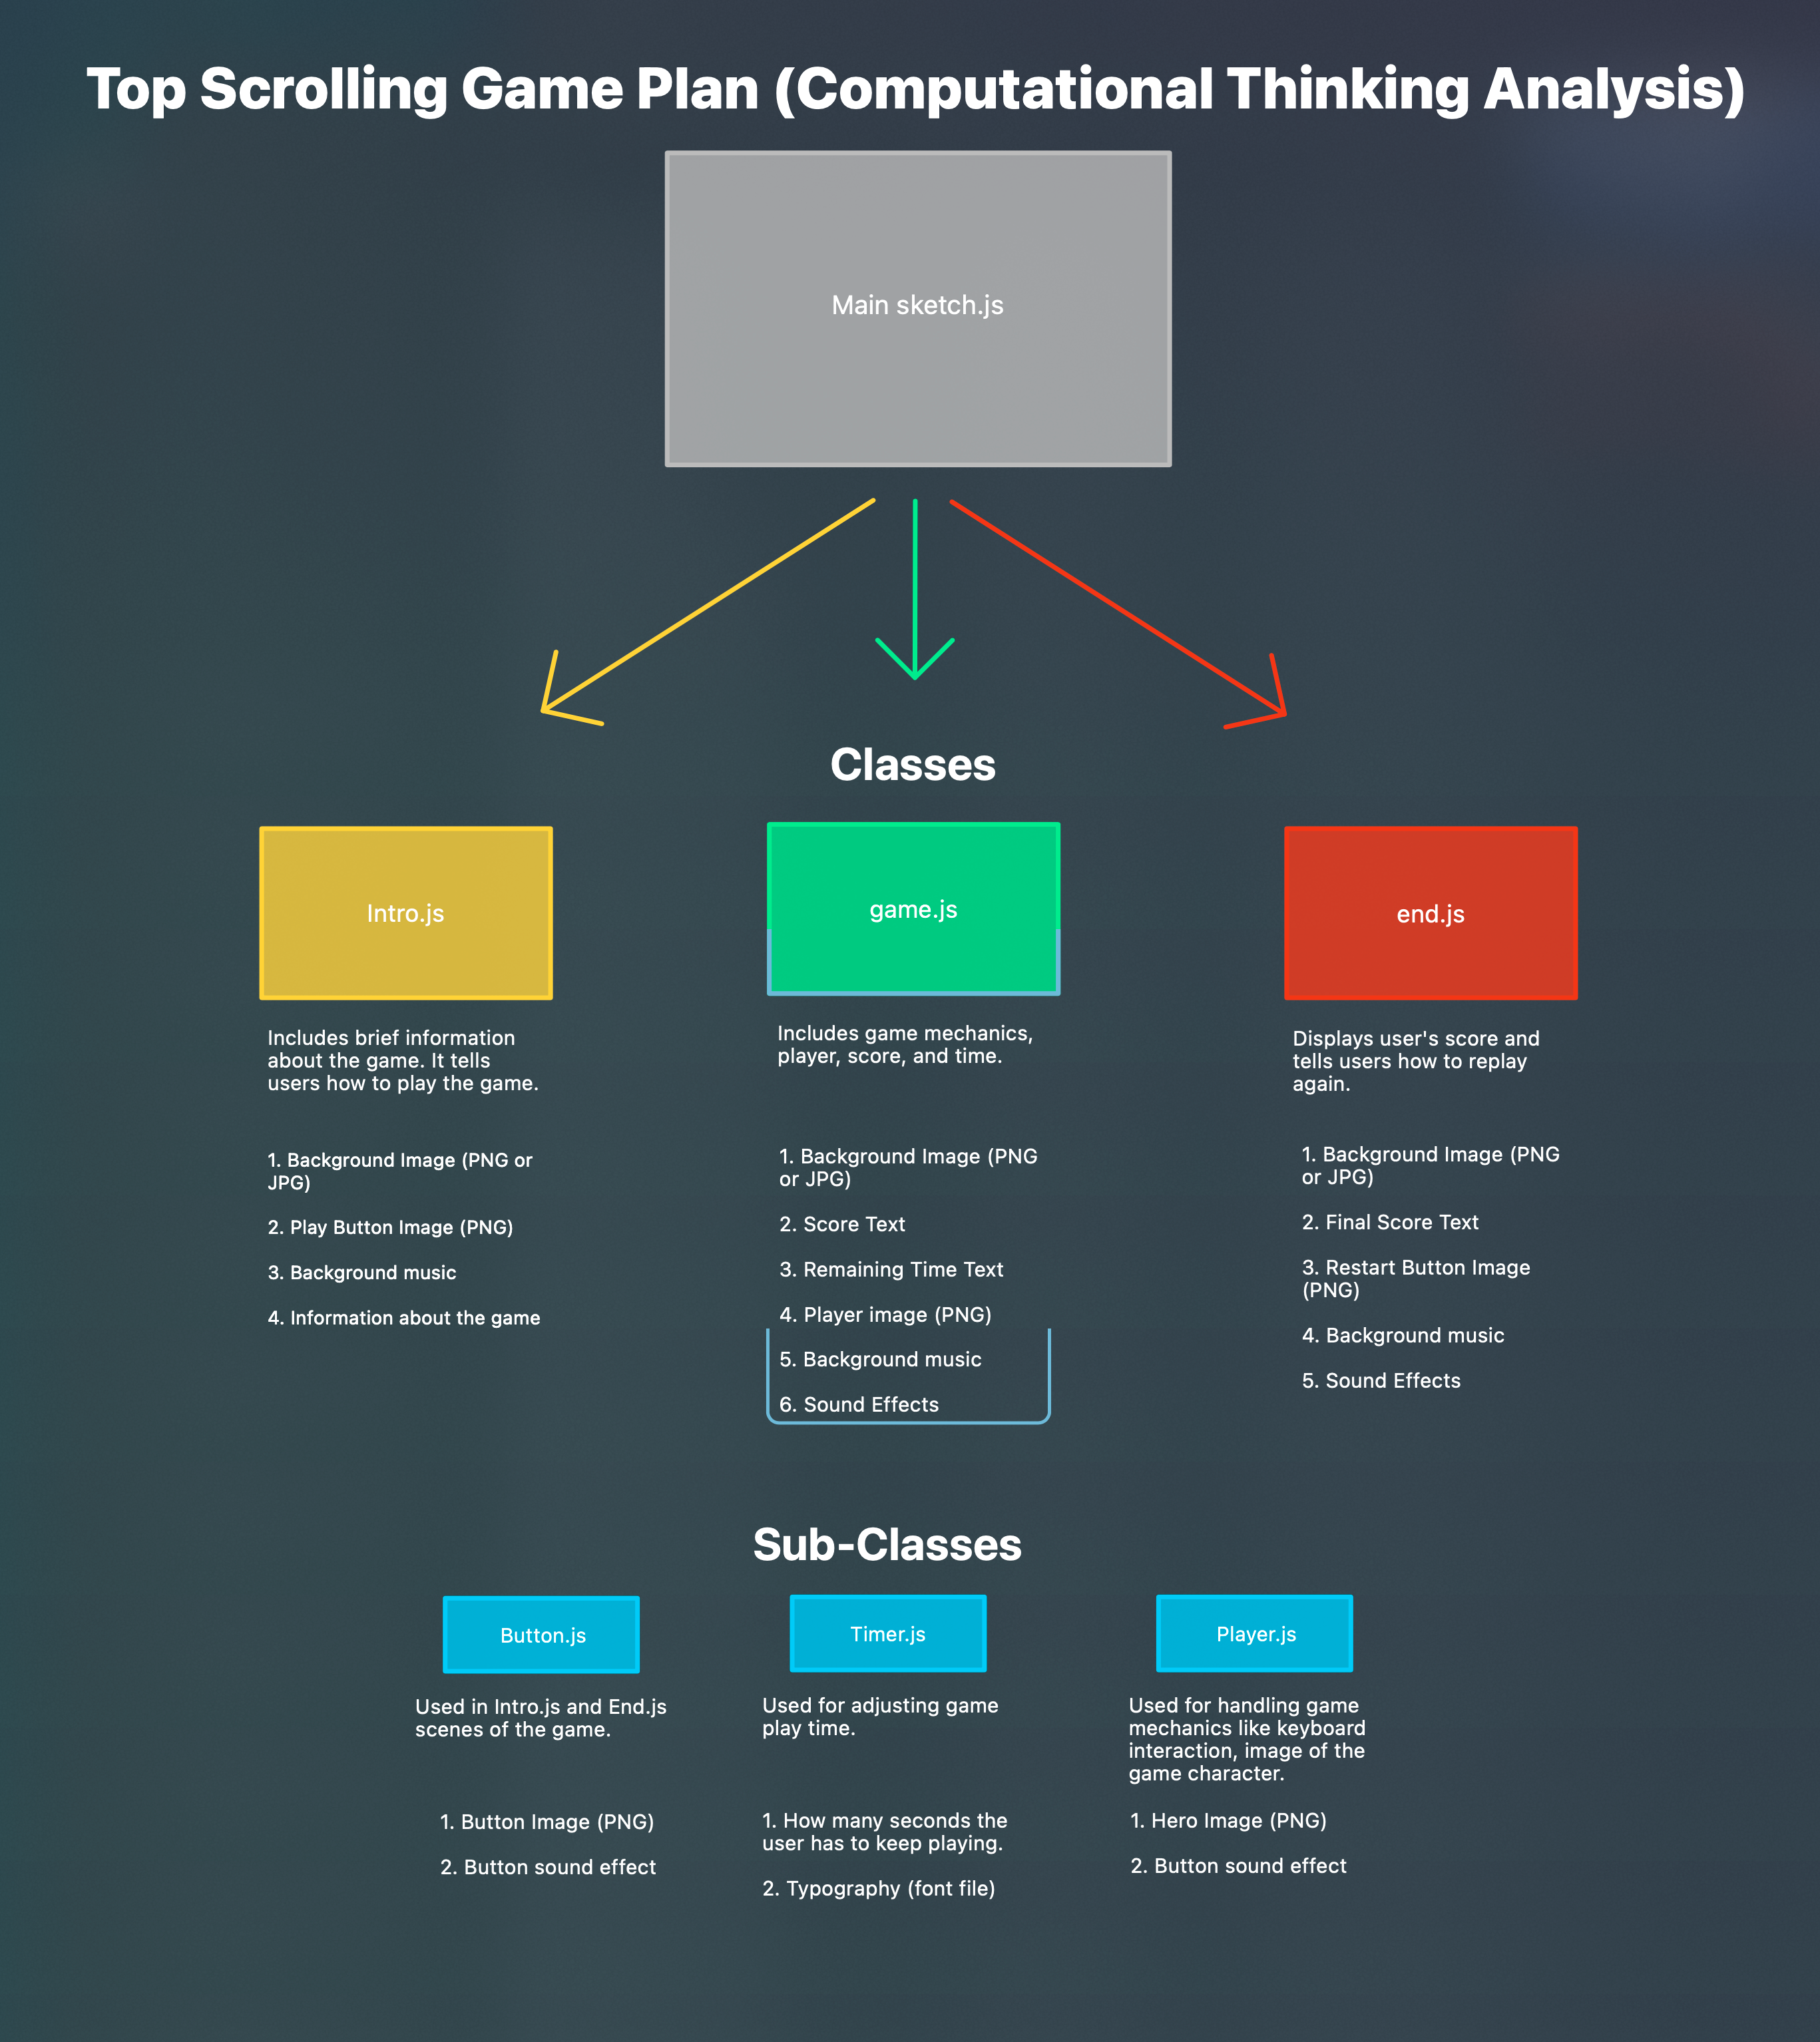
Prepare The Interface Elements
The first step is creating the game interface. You can start with sketching on paper. After you determine the fundamental requirements and draft material on paper, you can switch to digital space. Using your preferred image editing tool, you start to create game assets.
Export The Interface Elements
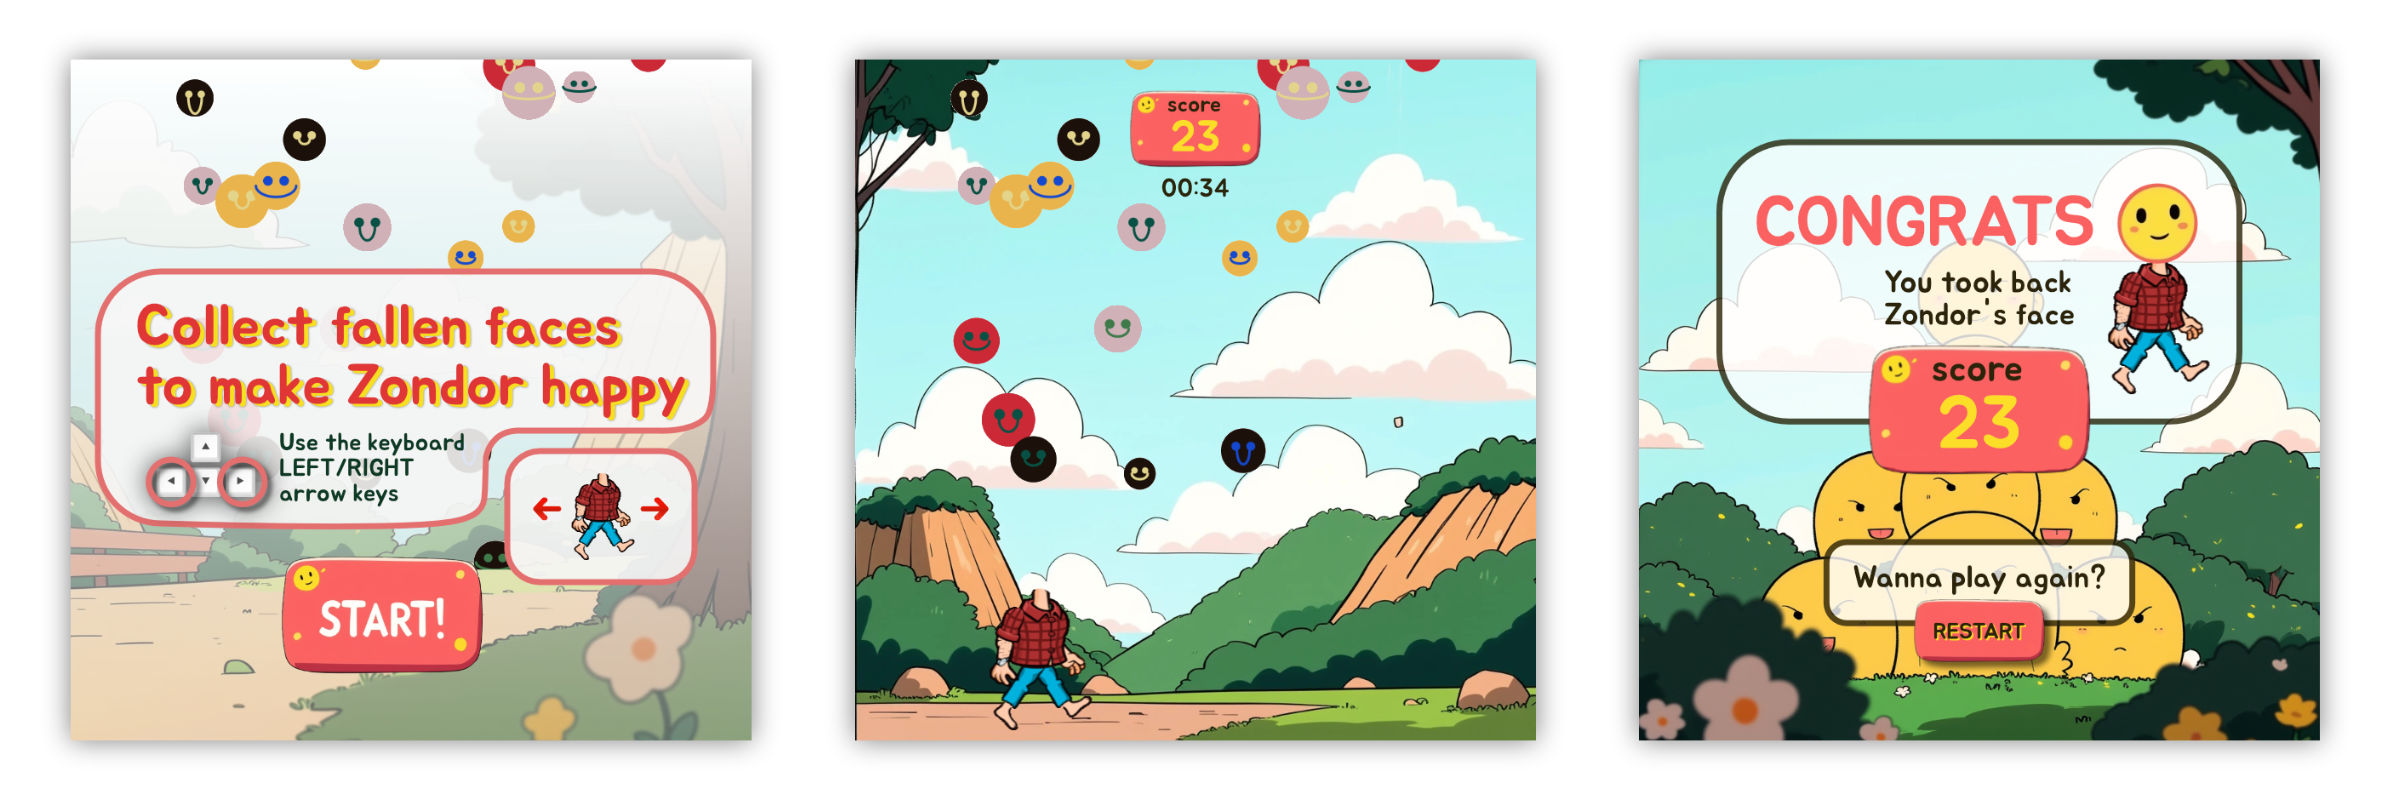
From left to right you see three different scene designs. Before exporting the files make sure that you design the interface 800x800 pixel size.
- Intro Scene: Export background image and Start button image separately.
- Game Scene: Export background image without fallen faces, main character and numbers showing the score and remaining time. We will display time and score dynamically in our game canvas. Lastly, export the main character as png.
- End Scene: Export the background design without the number showing score. We will display the score dynamically and draw in our game canvas.
Upload assets to the project
The following video exemplifies on how to upload assets for intro scene. Upload other game assets that you exported in the previous step as well.
Create Required Classes
In this section we will focus on creating custom classes that are required for the game. Object oriented programming paradigm allows developers to create sustainable code snippets which means that we can use a class later on another project. For instance, a class for handling user interface interaction like a button, can be used later for another game project. Or it can be used in any kind of UI related apps. To achieve that we need to keep the properties of the class dynamic. The following button object acts like that. It loads provided image rather than loading same image for a button. So when we can set visual appearance of the button according to the visual design of project. For the game project that has three scenes, we determine three classes;
- A button class capable of loading provided image as visual style, handling mouse/touch events and dispatching functions.
- A class for tracking overall time of the game acting as remaining time counter.
- The last class is for handling the hero interactions for the game. The Player class is responsible for handling user interaction to move the main character left ←> right in the game.
Watch the video and follow the steps below.
1. Clickable Button With Image
For into, and end scenes we need a user interface element, a button. Create new file on P5Js game project. Set the filename to Button.js and paste following code.
You can review the demo.

class Button {
  constructor(x, y) {
    this.x = x;
    this.y = y;
    this.width = 0;
    this.height = 0;
    this.image = null;
    this.scale = 1;
    this.listeners = [];
    this.isPressed = false;
    this.isEnabled = true;
    this.opacity = 255; // Full opacity by default

    // Add event listeners
    this.addEventListeners();
  }

  async setImage(imagePath, x, y) {
    return new Promise((resolve, reject) => {
      const img = new Image();
      img.onload = () => {
        // Create a p5.js compatible image
        const p5Img = createImage(img.width, img.height);
        p5Img.drawingContext.drawImage(img, 0, 0);

        this.image = p5Img;
        this.x = x;
        this.y = y;
        this.width = img.width;
        this.height = img.height;
        resolve();
      };
      img.onerror = reject;
      img.src = imagePath;
    });
  }

  addListener(listener) {
    this.listeners.push(listener);
  }

  isMouseOver() {
    return (
      mouseX > this.x - this.width / 2 &&
      mouseX < this.x + (this.width / 2) * this.scale &&
      mouseY > this.y - this.height / 2 &&
      mouseY < this.y + (this.height / 2) * this.scale
    );
  }
  handlePress() {
    if (this.isEnabled && this.isMouseOver()) {
      this.isPressed = true;
      this.scale = 0.9;
    }
  }

  handleRelease() {
    if (this.isEnabled && this.isPressed) {
      this.isPressed = false;
      this.scale = 1;
      if (this.isMouseOver()) {
        this.dispatch();
      }
    }
  }

  dispatch() {
    for (const listener of this.listeners) {
      listener();
    }
  }

  draw() {
    push();
    translate(this.x, this.y);
    scale(this.scale);
    if (this.image) {
      tint(255, this.opacity); // Apply opacity
      imageMode(CENTER);
      image(this.image, 0, 0);
    } else {
      rectMode(CENTER);
      fill(255, this.opacity);
      rect(0, 0, this.width, this.height);
    }
    pop();
  }
  enable() {
    this.isEnabled = true;
    this.opacity = 255;
    this.addEventListeners();
  }

  disable() {
    this.isEnabled = false;
    this.opacity = 100; // 90% opacity (255 * 0.9 ≈ 229)
    this.removeEventListeners();
  }

  addEventListeners() {
    this.handlePress = this.handlePress.bind(this);
    this.handleRelease = this.handleRelease.bind(this);

    // Mouse events
    window.addEventListener("mousedown", this.handlePress);
    window.addEventListener("mouseup", this.handleRelease);

    // Touch events
    window.addEventListener("touchstart", this.handlePress);
    window.addEventListener("touchend", this.handleRelease);
  }

  removeEventListeners() {
    // Mouse events
    window.removeEventListener("mousedown", this.handlePress);
    window.removeEventListener("mouseup", this.handleRelease);

    // Touch events
    window.removeEventListener("touchstart", this.handlePress);
    window.removeEventListener("touchend", this.handleRelease);
  }
}
2. Timer Class to Set and Display Remaining Time
For game play scene, we need a timer that shows and counts down game time. Create another one just as the previous step and paste following Timer.js. You can review the demo.
class Timer {
  constructor() {
    this.countDown = 0
    this.startTime = 0
    this.isRunning = false
    this.isFinished = false
  }

  setCountDown(seconds) {
    this.countDown = seconds
  }

  start() {
    if (!this.isRunning) {
      this.startTime = millis()
      this.isRunning = true
      this.isFinished = false
    }
  }

  stop() {
    if (this.isRunning) {
      this.isRunning = false
      this.countDown -= (millis() - this.startTime) / 1000
    }
  }

  restart() {
    this.stop()
    this.countDown = 0
    this.isFinished = false
  }

  update() {
    if (this.isRunning) {
      const elapsedTime = (millis() - this.startTime) / 1000
      if (elapsedTime >= this.countDown) {
        this.isRunning = false
        this.isFinished = true
        this.countDown = 0
      }
    }
  }

  draw() {
    if (this.isRunning) {
      const elapsedTime = (millis() - this.startTime) / 1000
      if (elapsedTime >= this.countDown) {
        this.isRunning = false
        this.isFinished = true
        this.countDown = 0
      }
    }

    if (this.isRunning || this.isFinished) {
      const remainingTime = Math.max(0, this.countDown - (millis() - this.startTime) / 1000)
      const displayTime = this.formatTime(remainingTime)

      push()
      textAlign(CENTER, CENTER)
      textSize(32)
      fill(255)
      text(displayTime, width / 2, height / 2)
      pop()
    }
  }

  formatTime(seconds) {
    if (seconds >= 60) {
      const minutes = Math.floor(seconds / 60)
      const remainingSeconds = Math.floor(seconds % 60)
      return `${minutes.toString().padStart(2, "0")}:${remainingSeconds.toString().padStart(2, "0")}`
    } else {
      return Math.ceil(seconds).toString()
    }
  }
}
3. Player Class to collect incoming items
Another required object is our main character in the game called hero. We need a Class that displays our hero character and allows us to control the movement via keyboard’s LEFT ←> RIGHT arrows. Create a new file in your project and name it Player.js. You can review the demo.
class Player {
  constructor(_gifPath, _x, _y, _w = 0, _h = 0) {
    this.x = _x;
    this.y = _y;
    this.width = _w;
    this.height = _h;
    this.speed = 5;
    this.image = null;
    this.enabled = false;
    this.keys = {
      ArrowRight: false,
      ArrowLeft: false,
    };

    // Bind the event handlers to maintain proper 'this' context
    this.handleKeyDown = this.handleKeyDown.bind(this);
    this.handleKeyUp = this.handleKeyUp.bind(this);
    this.setImage(_gifPath);

    this.enable();
  }

  setImage(gifPath) {
    // Remove previous image if exists
    if (this.image) {
      this.image.remove();
    }

    // Create new image element
    this.image = createImg(gifPath, "");

    // Style the image element
    this.image.style("position", "absolute");
    this.image.style("pointer-events", "none");

    // If size was set before image, apply it now
    if (this.width && this.height) {
      this.setSize(this.width, this.height);
    }
  }

  setSize(width, height) {
    this.width = width;
    this.height = height;

    if (this.image) {
      this.image.size(width, height);
    }
  }

  setSpeed(speed) {
    this.speed = speed;
  }

  setPosition(x, y) {
    this.x = x;
    this.y = y;
    if (this.image) {
      // Account for canvas position
      let canvas = document.querySelector("canvas");
      let rect = canvas.getBoundingClientRect();
      this.image.position(this.x + rect.left, this.y + rect.top);
    }
  }

  enable() {
    if (!this.enabled) {
      window.addEventListener("keydown", this.handleKeyDown);
      window.addEventListener("keyup", this.handleKeyUp);
      this.enabled = true;
      this.image.show();
    }
  }

  disable() {
    if (this.enabled) {
      window.removeEventListener("keydown", this.handleKeyDown);
      window.removeEventListener("keyup", this.handleKeyUp);
      this.enabled = false;
      this.image.hide();
    }
  }

  handleKeyDown(event) {
    if (this.keys.hasOwnProperty(event.key)) {
      this.keys[event.key] = true;
      event.preventDefault();
    }
  }

  handleKeyUp(event) {
    if (this.keys.hasOwnProperty(event.key)) {
      this.keys[event.key] = false;
      event.preventDefault();
    }
  }

  update() {
    if (this.enabled) {
      const rect = canvas.getBoundingClientRect();
      if (this.keys.ArrowRight) {
        this.x += this.speed;
        if(this.x >= rect.x + rect.width - this.width) this.x = rect.x + rect.width - this.width;
      }
      if (this.keys.ArrowLeft) {
        this.x -= this.speed;
        if(this.x <= rect.x) this.x = rect.x;
      }
      // Update image position
      if (this.image) {
        let canvas = document.querySelector("canvas");
        this.image.position(this.x + rect.x + rect.left, this.y + rect.y + rect.top);
      }
    }
  }

  draw() {
    if (this.image && this.enabled) {
      this.update();
    }
  }
}
Import Classes to the index.html file
Update the index.html file to import newly created files. Otherwise the sketch.js cannot access the classes. It should look like the following code:
<!DOCTYPE html>
<html lang="en">
  <head>
    <script src="https://cdnjs.cloudflare.com/ajax/libs/p5.js/1.11.1/p5.js"></script>
    <script src="https://cdnjs.cloudflare.com/ajax/libs/p5.js/1.11.1/addons/p5.sound.min.js"></script>
    <script src="Button.js"></script>
    <script src="Player.js"></script>
    <script src="Timer.js"></script>
    <script src="game.js"></script>
    <script src="circleFace.js"></script>
    <link rel="stylesheet" type="text/css" href="style.css">
    <meta charset="utf-8" />

  </head>
  <body>
    <main>
    </main>
    <script src="sketch.js"></script>
  </body>
</html>
Create the game scenes
1. Intro Scene
In order to start coding your game scenes, you need to clean up your main sketch.js file. Review the P5JS - How to create class article if you have issues converting your week2 assignment to a class. The following video presents how to create the intro class.
After the you created the intro.js class, update the index.html file.
<!DOCTYPE html>
<html lang="en">
  <head>
    <script src="https://cdnjs.cloudflare.com/ajax/libs/p5.js/1.11.1/p5.js"></script>
    <script src="https://cdnjs.cloudflare.com/ajax/libs/p5.js/1.11.1/addons/p5.sound.min.js"></script>
    <script src="Button.js"></script>
    <script src="Player.js"></script>
    <script src="Timer.js"></script>
    <script src="game.js"></script>
    <script src="intro.js"></script>
    <script src="circleFace.js"></script>
    <link rel="stylesheet" type="text/css" href="style.css">
    <meta charset="utf-8" />

  </head>
  <body>
    <main>
    </main>
    <script src="sketch.js"></script>
  </body>
</html>
Now, we start to code intro class. If you did not upload your game assets go and check Export interface elements section above. You also need to have created the objects that are shown in the Create Required Classes section above.
Your into.js class should look like below;
class intro {
  constructor() {
    this.x = 0;
    this.y = 0;

    this.width = 0;
    this.height = 0;

    this.img = null;
  }

  display() {
    if(this.img != null) {
      image(this.img, 0,0, this.width, this.height);
    }
  }

  async setImage(imagePath) {
    return new Promise((resolve, reject) => {
      const img = new Image();
      img.onload = () => {
        // Create a p5.js compatible image
        const p5Img = createImage(img.width, img.height);
        p5Img.drawingContext.drawImage(img, 0, 0);
        this.img = p5Img;
        this.width = img.width;
        this.height = img.height;
        resolve();
      };
      img.onerror = reject;
      img.src = imagePath;

    });
  }
}
Then, in your main sketch.js file, update the code base
// Now instantiate the game scene via game class
// Declare the variable
var sceneGame;
var sceneIntro;

// define a current variable
// we will have 3 main scenes -> "intro", "game", "end"
var currentScene;

function setup() {
  createCanvas(800, 800);

  sceneIntro = new intro();
  sceneIntro.setImage("s1_bg.jpg");

  // Create instance of the game class
  sceneGame = new game();

  // Set current scene
  // This will determine the order of the game scenes...
  currentScene = "intro";
}

function draw() {
  background(250);

  // Render Intro Scene
  if (currentScene == "intro") {
    sceneIntro.display()
  }

  // Render Game Scene
  if (currentScene == "game") {
    // To display the content we need to call display function in the game class
    sceneGame.display();
  }


  // Render End Scene
  if (currentScene == "end") {

  }
}

function keyPressed() {
  if (key === "s") {
    // Use the following naming convention while uploading the images.
    saveCanvas("week4-assignment-alptugan.jpg");
  }
}